Tissot TwoTimer Setting Instructions

The Twotimer is available in many different styles, in both round and rectangular cases but the setting instructions are identical for all. Interestingly, the quartz module used in this watch is also used in the early Breitling Aerospace.
Analog Display
Dial and hands indicate local time.
Local time is indicated in the dial's digital display. (Not on the watch above).
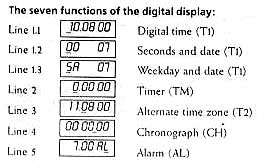
The Various Functions of The Digital Display
As well as local time, you may select six additional functions whilst the crown is in position A (see diagram above). The selected function is indicated by a flashing line at the base of the digital display. The marker line which appears in the digital display without flashing, indicates the function currently in use.
All Functions Are Crown Selected.
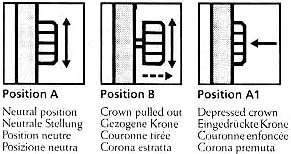
Pushing or pulling the crown selects one of three positions (see diagram above).
Neutral Position (position A)
In this position, the various functions are selected by turning the crown clockwise or counter-clockwise.
Crown Pulled Out (Position B)
This position permits corrections or settings to be made by turning the crown clockwise or counter-clockwise.
Crown in Depressed Position (Position A1)
In this position, the alarm is turned on or off, the chronograph is operated, the 12 or 24 hour time indication is selected or the alarm tested.
SETTING THE VARIOUS FUNCTIONS
1. Synchronising Analog and Digital Time
Turn the crown when in position A to put the digital display into neutral (display turned off).
Pull the crown to position B (digital display turned on).
Turn the crown in either direction until analog and digital time are synchronised.
Push the crown back to position A.
2. Setting Exact Time (T1)
Select digital display T1 (line 1.1 flashes) by turning the crown when in position A.
Pull crown out to position B and the hours and minutes flash.
Set local time by turning the crown when in position B. Analog and digital times are set simultaneously.
Push the crown back into position A. The seconds display will continue flashing for another minute to permit synchronisation of the watch with a time signal.
At the time signal, press the crown briefly to position A1 (fully depressed) and the seconds will set to 00.
3. Date Correction (T1)
Select seconds and date display by turning the crown when in position A. Line 1.2 will flash, seconds are displayed to the left and the date to the right.
Pull the crown to position B. The seconds display will disappear and the month will be displayed in the centre (month and date will be flashing).
Adjust month and date by turning the crown when in position B. A fast turn adjusts the months, a slow turn adjusts the date.
Push the crown back to position A.
Dial and hands indicate local time.
Local time is indicated in the dial's digital display. (Not on the watch above).
The Various Functions of The Digital Display
As well as local time, you may select six additional functions whilst the crown is in position A (see diagram above). The selected function is indicated by a flashing line at the base of the digital display. The marker line which appears in the digital display without flashing, indicates the function currently in use.
All Functions Are Crown Selected.
Pushing or pulling the crown selects one of three positions (see diagram above).
Neutral Position (position A)
In this position, the various functions are selected by turning the crown clockwise or counter-clockwise.
Crown Pulled Out (Position B)
This position permits corrections or settings to be made by turning the crown clockwise or counter-clockwise.
Crown in Depressed Position (Position A1)
In this position, the alarm is turned on or off, the chronograph is operated, the 12 or 24 hour time indication is selected or the alarm tested.
SETTING THE VARIOUS FUNCTIONS
1. Synchronising Analog and Digital Time
Turn the crown when in position A to put the digital display into neutral (display turned off).
Pull the crown to position B (digital display turned on).
Turn the crown in either direction until analog and digital time are synchronised.
Push the crown back to position A.
2. Setting Exact Time (T1)
Select digital display T1 (line 1.1 flashes) by turning the crown when in position A.
Pull crown out to position B and the hours and minutes flash.
Set local time by turning the crown when in position B. Analog and digital times are set simultaneously.
Push the crown back into position A. The seconds display will continue flashing for another minute to permit synchronisation of the watch with a time signal.
At the time signal, press the crown briefly to position A1 (fully depressed) and the seconds will set to 00.
3. Date Correction (T1)
Select seconds and date display by turning the crown when in position A. Line 1.2 will flash, seconds are displayed to the left and the date to the right.
Pull the crown to position B. The seconds display will disappear and the month will be displayed in the centre (month and date will be flashing).
Adjust month and date by turning the crown when in position B. A fast turn adjusts the months, a slow turn adjusts the date.
Push the crown back to position A.


